Showing posts with label Construction & Components. Show all posts

Saturday, October 10, 2015

Hand-Stitched Ornaments


Here's a fun way to make hand-crafted fabric ornaments.  It is very similar to the way I make hand-quilted eyes for my stuffed animals (you may want to review that post first).  They can be made from leftover scraps, and they make another nice portable project.

First, decide on a base layer of your ornament. I like to use felt as my sturdy back layer.

Then cut out layers of colored fleece, cotton, or felt to stack into an eye design, from largest to smallest or vice versa.  Fleece and cotton fabric will probably fray more, but may give you more color options. The larger/background colors are sewn first, with each smaller layer stacked on top and sewn individually.  


I like to use a matching thread to sew each color into place.  You can still see that each layer is hand-sewn, but the stitches don't disrupt your design too much.  But any complimentary color will work.  Knot each thread on the back of your panel so that the ends won't show through when the two panels are finally sandwiched together.

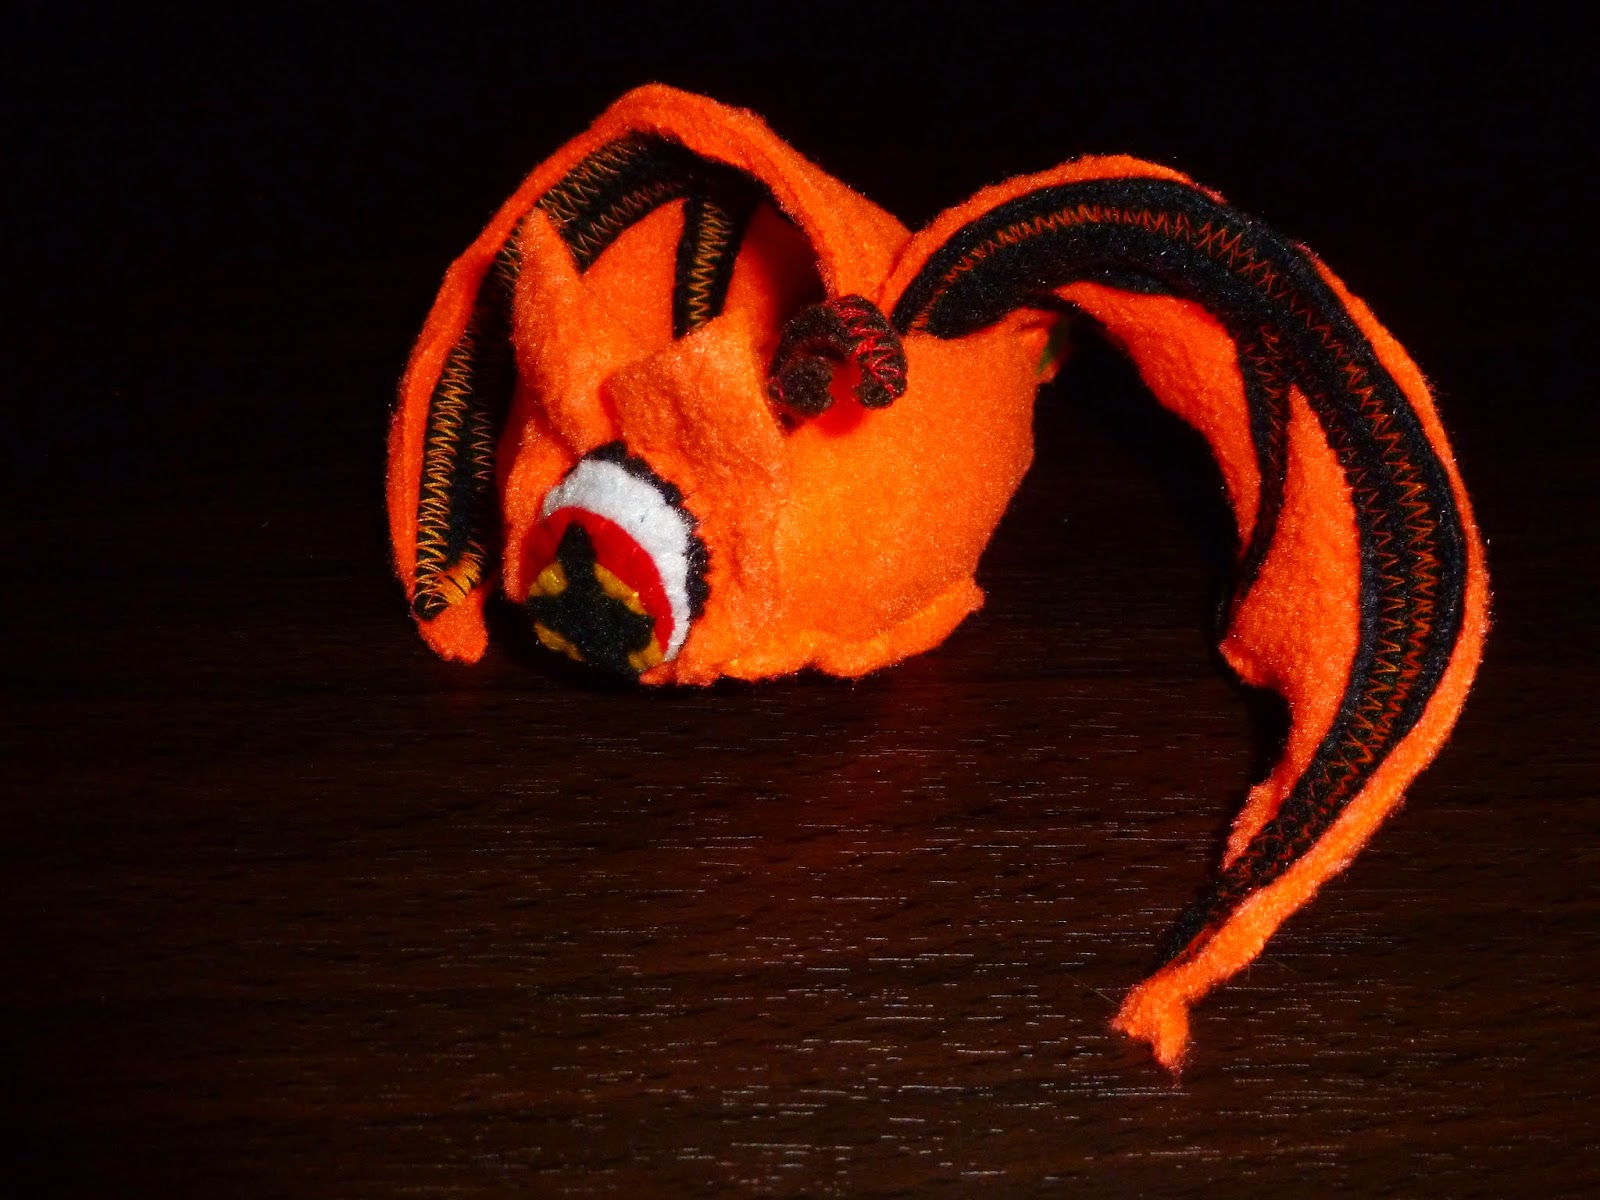
Lastly, add quilted felt eyes, or beads, or embroidery thread, for extra flair.  Remember to leave a felt edge surrounding eyes, to make stitching the eye into place easier (using a dark felt base for the eyes also creates a nice bold outline that helps your eye design to pop).

Once all of your embellishments are in place, stitch a ribbon loop into the top edge of one of your panels, about a quarter of an inch in.  Be careful to keep these stitches from piercing through the outermost layers of fabric, so that you do not disrupt your design, but use several stitches to securely attach the ribbon.


You now have two finished panels, like so:


You can then stitch the two panels back to back, along their felt borders.  I like to use thick black embroidery thread.


You can pull your thread ends through a bead and knot them with ribbon as an ornamental accent, or hide your thread ends in your stitching.


Keep the back panel plain, or create a double-sided piece:


As you can see, these techniques can be easily adapted to make decorative Christmas tree or door handle ornaments for any season.  Felt quilting can also be easily adapted for craft projects with children--all you would need would be colored felt, embroidery thread, and those blunt plastic embroidery needles, materials that can be found at most craft stores.

Have fun experimenting!

Friday, October 9, 2015

Plushie Construction: Hand-Quilted Eyes


In looking back over my previous construction tutorials, it appears that I have never completely addressed how I make the quilted eyes that I use for my stuffed animals.  I shall remedy that here!

QUILTING

As I have stated in previous posts, many people get confused about what quilting is.  They picture beautiful patchwork blankets (which are of course called "quilts"), and think that patchwork is quilting.  In fact, quilting is the sewing of multiple layers of sandwiched fabric together.  The traditional quilts that you may think of are usually one layer of patchwork, a layer of flat, insulating batting (stuffing), and then a "backing layer" (the underside of your quilt).  Some quilts have all three of these layers, while others are only made with a top and bottom layer.  In the amazing quilting technique of "Trapunto," the stuffing is bunched and molded into pockets that help the sewer create sculptural effect, an entire fabric bas-relief.

EYE CONSTRUCTION

I like to make my eyes out of felt.  Felt is a sturdy fabric that does not tend to fray when you use scraps in detail work, and it comes in a wide variety of colors.


The layers of different colors of felt create a slightly rounded dome--a cross between a two-dimensional and three-dimensional eye.  I use black felt as my base layer, white as the "white of the eye" (surprise), and then I get more creative with the iris and pupil.

I recommend cutting out all of your layers before stitching, so that you can see the overall size and effect while you can still tweak everything.  Make sure to leave a border of your base layer around your eye design, so that you can easily stitch your completed eyes to your plushie.  This border will also create a nice, bold eye border on your finished plushie face.


Try to use a matching thread color for each layer.  The eyes are still clearly hand-stitched, but the stitches won't distract from the overall eye design.


And voila, you have a quilted eye:


When attaching your eyes to your plushie, try to stitch at a bit of a diagonal, stitching from the outside of the eye and sliding the needle between the layers of fabric a bit, to tack a wider section of the felt eye to the plushie head.  These plushies may see some wear and tear, after all, and you don't want to worry about the eyes tearing off.


The larger the eye, the more detail and layers you can include.  But this eye technique looks great either way, and can give your plushie a nice bit of flair.  This is also a nice, compact bit of crafting that you can carry around with you from place to place, and it can turn your scraps into something functional.

Have fun crafting!

Saturday, October 4, 2014

BATS, Part 2 & MICROBATS

BATS, Continued:
Last time, I showed you how I made my first bat.  With my later bats, the main difference is that I now add simple little feet:
Before I stitch the body to the base panel, I tack a simple split-triangle piece into the bottom corner of the belly panel to create a little pair of feet.  This foot panel can be edged with stitching or not (the fleece will not fray).  This panel then gets sandwiched into the bottom front of the body when I stitch the last, base panel to the body:
My first two completed bats:
 
The eyes make up a lot of the personality of each bat:

THE MICROBAT:
For the "Microbat," I wanted to go even simpler and even smaller.  This plushie is made with 3 identical body panels, a face panel, and a pair of wings:
Here, I have all of the fleece panels I need, plus a small brow crest:
 My narrow care label panel also functions as a tail or mounting loop:
First, I stitch the skeletal ridges to the wings.  As stated in previous tutorials, I always use two layers of fleece to create a stiffer wing:
To create the body, I start by stitching two of the body panels together on one side with a zig-zag stitch.
 I then invert the double-wide panel , so that the stitches are facing up (towards the outside of the finished body), and sandwich the crest, wings, and folded label between it and the third panel.  I always stitch this seam two or three times, to make sure everything is secure.
I then stitch the final two long edges of the body panels together, with the stitches facing out.  All three body panels form a domed triangle shape, and I usually stitch the panels together so that the third, bottom panel which forms the belly has both its seam stitches on the outside, for extra flair and a flatter base.
Now that the body is all sewn together, I tack the head panel to the belly panel, right where my fingers can be seen pinching them together.  As with the belly seams, I tack the head to the body on the "right" side of the plushie, with the seam facing out.
All panels have now been attached. The microbat looks like this:
View from the side.  All that remains to finish the body is to add stuffing and tack the head to the neck:
Before I stuff and close the bat, I sew the eye(s) to the face, and secure the thread on the inner side of the panel.
I always try to stitch at an inward angle, to get more of the black felt securely quilted to the fleece panel.
Then I check all seams, and then stuff the body cavity, like so:
Finally, I spiral-stitch the face to the body, creating a secure seam and a decorative edge that matches the base seams:
Secure and hide the last knot (see the hidden knot tutorial), and voila!  A Microbat!

View of the underside of the wings and belly panel:
View of the wings from above:
Front view.  The points on the head panel become ears:
And that's how you make a Microbat!


Wednesday, September 24, 2014

BATS! The Basics...

Fun Fact: I based my bat pattern off of my red dragon pattern!  The general shape of the dragon head comprises the body for the bat.
 
COMPONENTS
The basic components for a bat, not counting miscellaneous spines, eyes, feet, etc.:
 
ASSEMBLY
The ear panels are assembled into cones and stitched to the forehead panel in the same way as in the red dragon's assembly (please see the red dragon tutorial for detailed instructions for both ear and wing construction).  Next, the two side panels, forehead, and belly panels are all stitched together, starting from the tip of the nose, to create a pouch.
 
Here, you can see the prototype pattern beside the prototype bat body (decorative spines have been sandwiched into the rear seam):
 
I then add a base panel and two wings.  These are exactly the same as the wings I use in my dragon pattern--two quilted layers of wing with a skeletal accent stitched into the inner side.
When all components are roughly assembled, the bat prototype looks like this:
For this prototype, I've sewn the wings together into one continuous piece (I've since decided that this is an unnecessary and complicating step, and no longer bother to do it, so feel free to skip doing this).
With the wings assembled, I now have three pieces: The body, the base, and the wings:
I lay the inside-out bat against the base panel, sandwiching the wings between the back seam (the one with the spines) and the top of the base panel, and stitch them together 3/4ths of the way around.  Then I sew the eyes onto the bat face.  With this prototype, I have also sewn two stuffed cones to the face, to create a beak.
 
Finally, I simply stuff the bat and stitch the final edge closed (You may review how to close your plushie using whip stitch and blind stitch here).
 
And there you have it!
That's how I made my first bat!

 
I hope you enjoyed this tutorial.

Next time, I'll show you how to make the "Microbat," which is much simpler, and I'll show you some more pictures of my completed bats.

See you then!

Friday, August 29, 2014

Happy Labor Day Weekend!

What will I be doing this coming weekend?

I will be hiking and hanging out with friends.  What better?  And it should be cooler than the 95-99 degree heat that we've been experiencing this weekend...  "80 degrees" sounds like a refreshing change of pace...

In addition to being social, I'll also (no surprise) be crafting!

Labor Day is a holiday that celebrates workers' achievements, and their contributions to the nation's well-being.  While some might say arts and crafts are a bit of a different kind of "labor" than the holiday was originally referencing, art and textiles continue to add a great deal to one's quality of life.  Additionally, "holiday" to me means time for friends, family, and those hobbies and pursuits that are valued but don't tend to get enough attention during the regular grind.  So...crafting!

What have I been up to lately, crafts-wise?  Bats!
Whenever I have a few minutes, but don't feel like starting a large project, I will sew some felt eyes, or cut some scales out of scraps I have waiting.


That way, when I do have more time or focus, I'll have everything I need to make a plushie ready and waiting:
This past month, I've been cutting out panels in anticipation of my new batch of bats.  The Fall season is fast approaching, and I would like to stock up on finished bats before October. 

So I've been stitching spines,
 
and eyes

and wings!

I've decided to branch out into other Autumnal and Evening colors, so I think I'm going to have fun!
I'll keep you apprised of my progress...
 
I've also started work on a "Bat Construction" tutorial, so look for that a little closer to October.
 
I hope you all have a lovely weekend.  And to all you U.S.-based folk, have a lovely holiday!